
TypeScript とは、 いわゆる altJS のひとつで、 ECMAScript (JavaScript) に静的型付けを加えたスーパーセットとなるプログラミング言語だ。
この TypeScript には、 ES6 (ECMAScript 6, Harmony) 相当のコードから ES5, ES3 にコンパイル (トランスパイル) する機能のほか、 ES7 で予定されている一部の機能を先取りし ES6 にコンパイルして使用することもできる。
そんな時代を先取りした機能の一つが "async/await" だ。
"async/await" とは 2012年に C# 5.0 とともに登場した記述方法で、 これを使うと、 非同期な処理を コールバック地獄にならず、 あたかも同期的な処理のように書くことができる。
同様の記述が、最近 Python 3.5 でもサポートされ、これからの非同期処理のスタンダードとなるだろう。
しかし、 TypeScript で async/await を使うには コンパイル後の ECMAScript の実行環境が ES6 をサポートしていなくてはならない。
現行のブラウザのシェアを考えると、 ES6 をサポートしないブラウザ (主に IE, Safari だが) を切り捨てる選択肢はちょっと厳しい。
一方でサーバサイド JavaScript として有名な node.js では、最近になって組織の変更のおかげで開発が活発化し、 ES6 のサポートが入ってきている。
しかし、 node.js はサーバサイドの技術。 クライアントアプリで使えた方がいろいろな用途で使えて夢が広がる気がする。
そこで Electron ですよ。
Electron (旧 Atom-Shell) とは、 Chromium の HTML5 と node.js の技術を使って、クロスプラットフォームのデスクトップアプリを作れるアプリケーションエンジンだ。
JavaScript エンジンごと中に内包しているため、 OS や インストールされたブラウザのバージョンを一切気にせずに HTML5 アプリケーションが作れるという、 IE に苦しめられている諸兄には夢のような技術 (?) だ。
Slack のデスクトップクライアントや、Visual Studio Code なんかも、 Electron を使って作られている。
そしてこの Electron は node.js の技術を使っていると述べたとおり、 ES6 がつかえるではないか!
…ということで、 Electron + TypeScript で async/await を使ってみようと思う。
| メモ: |
ES6 から ES5 へトランスパイルするツールは、 TypeScript のほかにも Babel が有名だ。 |
Electron の開発環境
導入法としておなじみなのは、 node.js の npm を使って ダウンロードする方法だ。
Electron を開発するのに node.js のインストールは必須ではない (Electron 内部の node.js を使って動作するため) が、 npm があったほうが何かと便利なので、 node.js がインストールされていることを前提にする。
以降は、 Electron 1.2.2 を使うものとして説明する。
バージョン 1.x となって落ち着いたものの、 それでも Electron は更新頻度が高いほか、不具合修正や仕様変更で バージョンごとに動作が変わってしまうことが多いので、注意されたい。
| メモ: | 以前は、プロキシ環境下で npm を使ってダウンロードする際、npm 自体のプロキシ設定のほか、 electron のバイナリダウンロードを行うツールのために、 HTTP_PROXY, HTTPS_PROXY 環境変数にも プロキシ設定が必要だった。 参考: https://github.com/request/request/tree/f0c4ec061141051988d1216c24936ad2e7d5c45d#controlling-proxy-behaviour-using-environment-variables 1.2.2 以降の場合はパッケージのダウンロード方法が変わっており、次の記事を参考に npm config の設定を行なえばプロキシの設定が反映される。 |
TypeScript コンパイル環境の導入
async/await には 1.7 以上の TypeScript コンパイラ が必要だ。
(実は 1.6 でもこっそりサポートしていたが、正式サポートは 1.7 からである。)
TypeScript コンパイラ (tsc) も node.js の npm を使ってダウンロードすることもできるが、今回は VisualStudio を使おう。
Visual Studio は 2013 または 2015, エディションは Community でも Exspress for Web でもかまわない。 TypeScript の拡張機能をインストールまたは更新しよう。
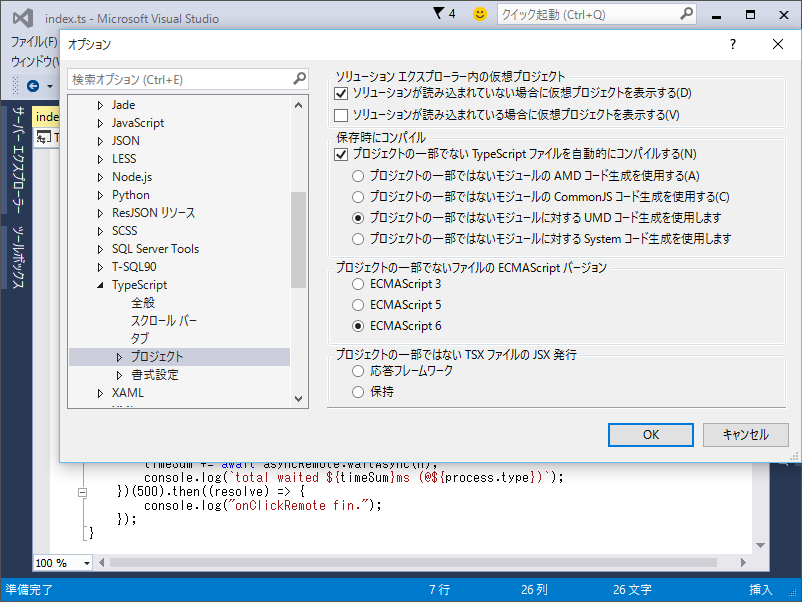
オプションのテキストエディタの設定から、 [TypeScript] -> [プロジェクト] から、 「プロジェクトの一部でない TypeScript ファイルを自動的にコンパイルする」 の設定を ☑ にする。
また、 TypeScript 1.7 で async/await がコンパイルできるのは ECMAScript 6 にコンパイルするときだけなので、 保存時に ECMAScript 6 にコンパイルするように設定する。
(2.0 になれば、 ES5/ES3 へもコンパイル可能になる予定だ。)
こうすることで、 TypeScript の .ts ファイルを編集して保存した際に、同じフォルダに コンパイルされた .js が作成されるようになる。
早速 Electron で書いてみる
まず、任意のディレクトリで、 以下のコマンドを実行しよう。
npm init -y
npm install electron-prebuilt@1.2.2 --save-dev
すると、 package.json ファイルと、 [node_modules] フォルダ の2つが できあがる。
そこへ、下記のような構成になるように、ファイルを作成していこう。
[.]
├ package.json
├ main.js
├ index.html
├ index.ts
├ asyncTest.ts
└ [node_modules]
 └ ...
package.json
@@ -2,9 +2,9 @@
   "name": "electron-with-ts",
   "version": "1.0.0",
   "description": "",
-  "main": "index.js",
+  "main": "main.js",
   "scripts": {
-    "test": "echo \"Error: no test specified\" && exit 1"
+    "start": "electron ."
   },
   "keywords": [],
   "author": "",
上記のような感じに書き換える。
結果、以下のようになるはずだ。
{
  "name": "app",
  "version": "1.0.0",
  "description": "",
  "main": "main.js",
  "scripts": {
    "start": "electron ."
  },
  "keywords": [],
  "author": "",
  "license": "ISC",
  "devDependencies": {
    "electron-prebuilt": "^1.2.2"
  }
}
main.js
const electron = require('electron')
// Module to control application life.
const app = electron.app
// Module to create native browser window.
const BrowserWindow = electron.BrowserWindow

// Keep a global reference of the window object, if you don't, the window will
// be closed automatically when the JavaScript object is garbage collected.
let mainWindow

function createWindow () {
  // Create the browser window.
  mainWindow = new BrowserWindow({width: 800, height: 600})

  // and load the index.html of the app.
  mainWindow.loadURL(`file://${__dirname}/index.html`)

  // Open the DevTools.
  mainWindow.webContents.openDevTools()

  // Emitted when the window is closed.
  mainWindow.on('closed', function () {
    // Dereference the window object, usually you would store windows
    // in an array if your app supports multi windows, this is the time
    // when you should delete the corresponding element.
    mainWindow = null
  })
}

// This method will be called when Electron has finished
// initialization and is ready to create browser windows.
// Some APIs can only be used after this event occurs.
app.on('ready', createWindow)

// Quit when all windows are closed.
app.on('window-all-closed', function () {
  // On OS X it is common for applications and their menu bar
  // to stay active until the user quits explicitly with Cmd + Q
  if (process.platform !== 'darwin') {
    app.quit()
  }
})

app.on('activate', function () {
  // On OS X it's common to re-create a window in the app when the
  // dock icon is clicked and there are no other windows open.
  if (mainWindow === null) {
    createWindow()
  }
})

// In this file you can include the rest of your app's specific main process
// code. You can also put them in separate files and require them here.
index.html
<!DOCTYPE html>
<html>
<head>
    <title>Hello World!</title>
    <script src="index.js"></script>
</head>
<body>
    <h1>Hello World!</h1>
    We are using node.js
    <script>document.write(process.version)</script>
    and Electron
    <script>document.write(process.versions['electron'])</script>.
    <ul>
        <li><button onclick="onClickRunAtClientWaitAtClient()">onClickRunAtClientWaitAtClient</button></li>
        <li><button onclick="onClickRunAtRemoteWaitAtClient()">onClickRunAtRemoteWaitAtClient</button></li>
        <li><button onclick="onClickRunAtRemoteWaitAtRemote()">onClickRunAtRemoteWaitAtRemote</button></li>
    </ul>
</body>
</html>
index.ts
declare function require(name: string): any;

var asyncClient = require('./asyncTest');
var asyncRemote = require('electron').remote.require('./asyncTest');

async function onClickRunAtClientWaitAtClient() {
    var n = 500;
    var timeSum = 0;
    timeSum += await asyncClient.waitAsync(n);
    timeSum += await asyncClient.waitAsync(n);
    timeSum += await asyncClient.waitAsync(n);
    console.log(`total waited ${timeSum}ms (@${process.type})`);
    console.log("onClickClient fin.");
}

async function onClickRunAtRemoteWaitAtClient() {
    var n = 500;
    var timeSum = 0;
    timeSum += await asyncRemote.waitAsync(n);
    timeSum += await asyncRemote.waitAsync(n);
    timeSum += await asyncRemote.waitAsync(n);
    console.log(`total waited ${timeSum}ms (@${process.type})`);
    console.log("onClickRemote fin.");
}

async function onClickRunAtRemoteWaitAtRemote() {
    await asyncRemote.runTimes(5, 500);
    console.log("onClickRemoteRun fin.");
}
asyncTest.ts
declare function require(name: string): Object;
declare var module: { exports: any };
declare var process: any;

// ウィンドウモードで立ち上げると、 console.log で例外になる場合がある
function tryLog(s: string) {
    try {
        console.log(s);
    } catch (e) { }
}

module.exports.waitAsync = async function waitAsync(n: number): Promise<number> {
    var startTime = Date.now();
    var timeInterval = await new Promise<number>((resolve) => setTimeout(() => resolve(Date.now() - startTime), n));
    tryLog(`waited ${timeInterval}ms (@${process.type})`);
    return timeInterval;
}

module.exports.runTimes = async function runTimes(c: number, n: number): Promise<void> {
    var timeSum = 0;
    for (var i of Array.from({ length: c }, (v, k) => k)) {
        timeSum += await module.exports.waitAsync(n);
    }
    tryLog(`total waited ${timeSum}ms (@${process.type})`);
}
main.js は electron-quick-start の CC0 コードを拝借したもの。
Visual Studio で、各 .ts を保存後、それぞれに対応した .js ファイルがコンパイルされていれば、成功だ。
(1) 指定時間 wait して、実際に待機した時間を非同期で返す関数
(2) 上記の大気を複数回行い、実際に待機した時間の合計時間を非同期で返す関数
それぞれを用意した。
Electron では、 ウィンドウ上の Webページの制御を行う Renderer Process と、起動時のメインスクリプトを動かしたり 新しい ウィンドウを表示したり そのほか負荷の重い処理を制御する Main Process (Browser Process ともいう) と、 ふたつに分かれて動作している。
これを
- onClickRemoteClient
- (1) も (2) も Renderer Process で実行
- onClickRemote
- (1) は remote モジュールで Main Process で実行し、 (2) はRenderer Process で実行
- onClickRemoteRun
- (1) も (2) も remote モジュールで Main Process で実行
となるように、それぞれ関数を定義している。
process.type で、現在 Renderer Process と Main Process のどちらで動作しているのか取得することができるので、 そいつを コンソールにはいて、現在どのプロセスで実行されているのかを確認するようにしている。
| メモ: |
TypeScript 流儀のモジュールの書き方が存在するのだが、それを使うと ES6 のモジュール定義方法にコンパイルされてしまう。 そうなってしまうと、 CommonJS のモジュール定義を期待する node.js 側でモジュールを読み込むのがかなり面倒になるので、 あえて CommonJS のモジュールの書き方にあわせて書いている。 |
動かしてみる
コンソール上 から npm start を実行し、 electron を起動してみよう。 こうすることで Main Process で console.log した結果が コンソールに表示されるようになり、デバッグがしやすくなる。
onClickRunAtClientWaitAtClient を実行した場合は、 非同期wait も wait 時間の合計の計算も Renderer Process で行っているので、ログはすべて Electron のデバッグコンソール側に表示される。
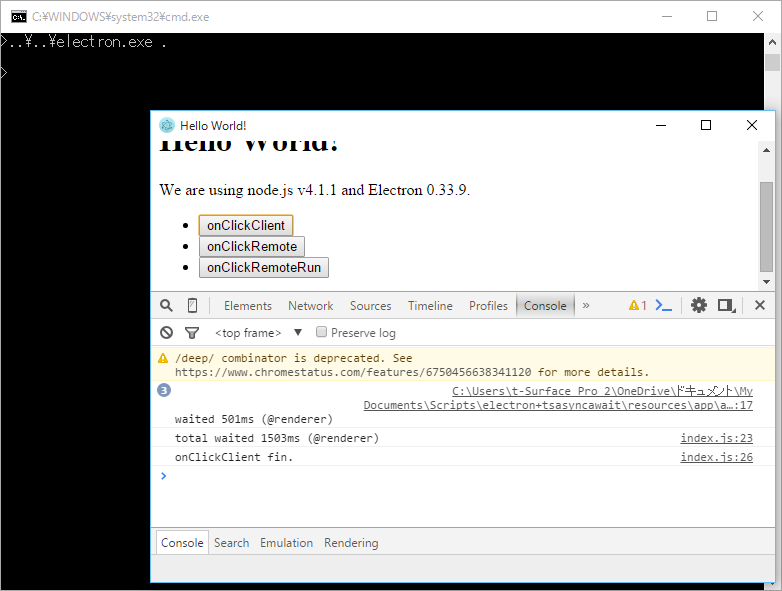
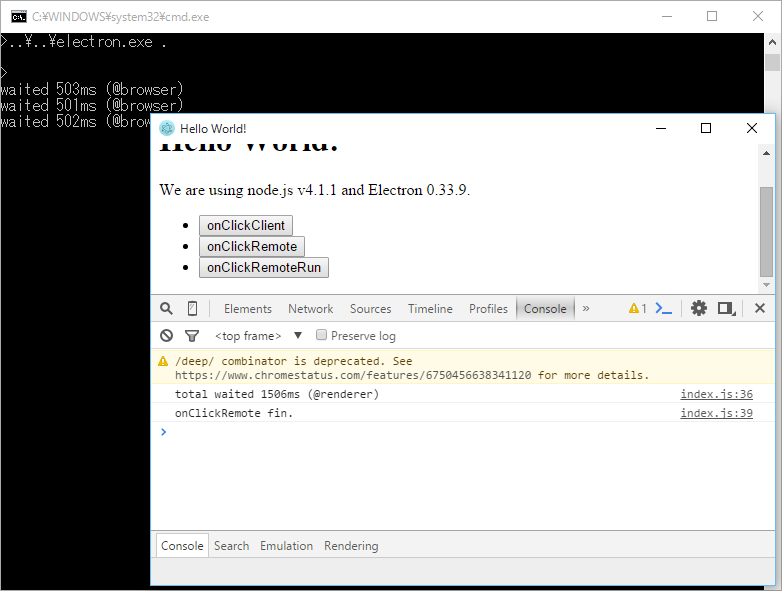
onClickRemote を実行した場合は、 非同期wait のログは Main Process で行っているので、そのログは 呼び出したコンソール側に表示されるが、 wait 時間の合計の計算は Renderer Process で行っているので、そのログは Electron のデバッグコンソール側に表示される。
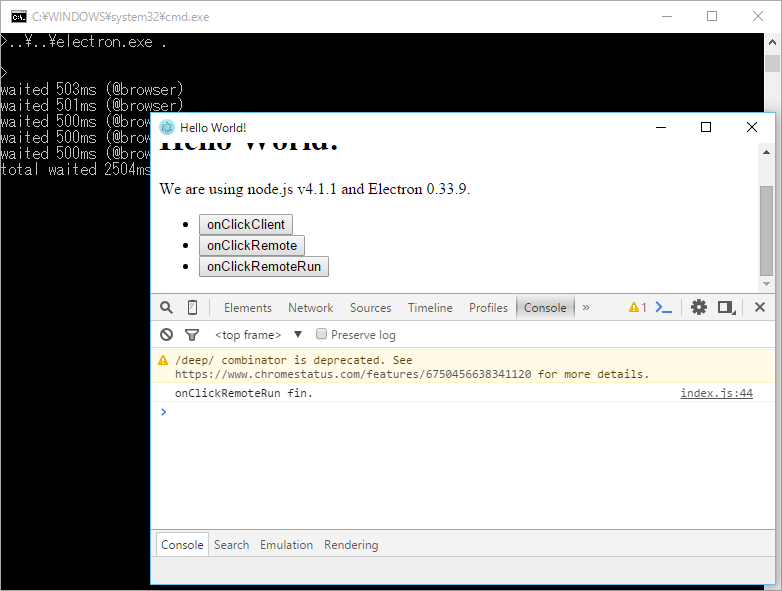
onClickRemoteClient を実行した場合は、 非同期wait も wait 時間の合計の計算も Main Process で行っているので、ログはすべて 呼び出したコンソール側に表示される。
また、 onClick のいずれかを動作中に、他の onClick をクリックしたとき、前の関数の終了を待たずに処理を開始することからも、これらの関数が非同期的に動作していることがわかるだろう。
このように async/await を使えば、 IO アクセスや、ネットワークアクセスなど、時間のかかる処理を Main Process 側で行っても、同期処理のように書くことができるので、ソースコードが非常にきれいになる。
| メモ: |
本格的に Main Process のデバッグをしたいのであれば、 node.js の node-inspector と、 Chromium 系ブラウザを使うとよいだろう。 Chrome のデバッグツールと同等のデバッグができる。 |
TypeScript のコンパイル結果は?
ちなみに、 *.ts を ES6 にコンパイルした結果はこのようになる。
index.js
var __awaiter = (this && this.__awaiter) || function (thisArg, _arguments, P, generator) {
    return new (P || (P = Promise))(function (resolve, reject) {
        function fulfilled(value) { try { step(generator.next(value)); } catch (e) { reject(e); } }
        function rejected(value) { try { step(generator.throw(value)); } catch (e) { reject(e); } }
        function step(result) { result.done ? resolve(result.value) : new P(function (resolve) { resolve(result.value); }).then(fulfilled, rejected); }
        step((generator = generator.apply(thisArg, _arguments)).next());
    });
};
var asyncClient = require('./asyncTest');
var asyncRemote = require('electron').remote.require('./asyncTest');
function onClickRunAtClientWaitAtClient() {
    return __awaiter(this, void 0, void 0, function* () {
        var n = 500;
        var timeSum = 0;
        timeSum += yield asyncClient.waitAsync(n);
        timeSum += yield asyncClient.waitAsync(n);
        timeSum += yield asyncClient.waitAsync(n);
        console.log(`total waited ${timeSum}ms (@${process.type})`);
        console.log("onClickClient fin.");
    });
}
function onClickRunAtRemoteWaitAtClient() {
    return __awaiter(this, void 0, void 0, function* () {
        var n = 500;
        var timeSum = 0;
        timeSum += yield asyncRemote.waitAsync(n);
        timeSum += yield asyncRemote.waitAsync(n);
        timeSum += yield asyncRemote.waitAsync(n);
        console.log(`total waited ${timeSum}ms (@${process.type})`);
        console.log("onClickRemote fin.");
    });
}
function onClickRunAtRemoteWaitAtRemote() {
    return __awaiter(this, void 0, void 0, function* () {
        yield asyncRemote.runTimes(5, 500);
        console.log("onClickRemoteRun fin.");
    });
}
asyncTest.js
var __awaiter = (this && this.__awaiter) || function (thisArg, _arguments, Promise, generator) {
    return new Promise(function (resolve, reject) {
        generator = generator.call(thisArg, _arguments);
        function cast(value) { return value instanceof Promise && value.constructor === Promise ? value : new Promise(function (resolve) { resolve(value); }); }
        function onfulfill(value) { try { step("next", value); } catch (e) { reject(e); } }
        function onreject(value) { try { step("throw", value); } catch (e) { reject(e); } }
        function step(verb, value) {
            var result = generator[verb](value);
            result.done ? resolve(result.value) : cast(result.value).then(onfulfill, onreject);
        }
        step("next", void 0);
    });
};
// ウィンドウモードで立ち上げると、 console.log で例外になる場合がある
function tryLog(s) {
    try {
        console.log(s);
    }
    catch (e) { }
}
module.exports.waitAsync = function waitAsync(n) {
    return __awaiter(this, void 0, Promise, function* () {
        var startTime = Date.now();
        var timeInterval = yield new Promise((resolve) => setTimeout(() => resolve(Date.now() - startTime), n));
        tryLog(`waited ${timeInterval}ms (@${process.type})`);
        return timeInterval;
    });
};
module.exports.runTimes = function runTimes(c, n) {
    return __awaiter(this, void 0, Promise, function* () {
        var timeSum = 0;
        for (var i of Array.from({ length: c }, (v, k) => k)) {
            timeSum += yield module.exports.waitAsync(n);
        }
        tryLog(`total waited ${timeSum}ms (@${process.type})`);
    });
};
C# の async/await と Task クラスと 反復子 の関係と同じで、 ES6 + TaskScrypt の async/await 実態は Promise と Generator となっているようだ。
ES5 へのコンパイルでは async/await 使えないのは、 Promise と Generator がないからというわけだ。
async 関数で返されるものは Promise のインスタンスなので、 await しない場合は promise.then() を使うことができる。
逆に async 関数で返されたものでなくても、 Promise のインスタンスであれば await することもできるのだ。
(後者は、 asyncTest.ts の 14行目 付近でもやっている)
更新履歴
- 2015-10-19
- 冒頭の説明文を少し変更
- index.ts のテストコードを、終了イベントを拾わない方式に変更
- 2016-06-26
- TypeScript 1.7 以降で async/await が正式サポートされるようになったので、記述を変更。
- electron 0.33.9 用のコードが 1.x 以降で動作しなくなっていたので、 1.x で動作するコードに修正
- electron 開発環境の導入方法を、 1.x 以降で推奨される npm を使ったものに変更。